Saturday, April 18, 2009

Strawberry Blintzes and my secret little restaurant

Before I tempt you into wanting-- no, lusting, for this wonderful treat-- I want to share with you one of my closest guarded secrets. I grew up in Carmel, California. Yes, that place where Clint Eastwood was mayor-- long ago. I graduated from Carmel High School-- long ago. I'd drive my mother's 1965 Mustang and cruise along the Carmel Beach to drool at the surfers-- long ago.

Still, one of my favorite haunts is a closely guarded secret-- it's a restaurant called "The Little Swiss Cafe". This local's haunt doesn't take credit cards and there is always a wait (unless you go during the week-- except summer-- and early. I went to high school with many of the servers, who have worked there for decades. There are two menu items that are a "must have". They are their cheese blintzes and eggs benedict. When my former classmates see me, they know... 1/2 order of each. I can't decide. It's the best. I swear. I have been ruined, for life, in how I expect my cheese blintzes to taste. They have set the bar really high for the best cheese blintzes.
Oops! My secret is out. So, if you are in Carmel, California please let me know. I'll split an order with you!


Now then... I saw Muneeba, from "An Edible Symphony's" entry for Tyler Florence Friday was for Blueberry Blintzes. If you haven't checked out her blog, please do so. She gives beautiful step-by-step photos (and I appreciate those) and she's also very funny...hysterically funny. After studying how she made them, I knew I could do this. Muneeba, this is for you!

Before I launch into how I adapted the recipe (sorry Tyler, but I'm not a huge fan of blueberries...I like them, but I adore strawberries) I finally took a hard look at my authentic French crepe pan. Last July, my husband treated me to a culinary class on making peach crepes at the beautiful Culinary Institute of America (C.I.A.) in the Napa-Sonoma area. One week later, I went on a serious exercise and diet (and I lost 20 pounds), so I never made these.

There's my blonde head, paying rapt attention to the chef. It was a lot of fun!

Isn't that a cool setup? You don't want to know how much it costs to take private classes...

The Little Swiss Cafe serves their blintzes with sour cream and strawberry preserves. I had some Driscoll berries that were reaching their prime, otherwise I would never cook these! I decided to make a strawberry compote using some water, corn starch and sugar-- and a little orange zest.

I remember C.I.A. chef's comments that you should always let your crepe batter rest-- even overnight. So I made the batter and I swam for an hour in our lap pool (part of my subdivision...I'm not that rich!), showered and returned to the kitchen.

I read the instructions on how to season the pan "cook potato peels in fat or oil and then toss them away...your pan is now ready for use". Really? Like a little lamb, I followed the directions.

Now, it was time to make the filling. The little Swiss Cafe makes the BEST filling! Can I replicate it?

I wanted to add my own little touch with orange zest. In retrospect, I should have used half of this, but still I'm glad that I added it. I tasted the filling, and decided to put 2 more tablespoons of powdered sugar-- and then 1 teaspoon of vanilla. That's what makes The Little Swiss Cafe's blintzes so good-- they are sweet, but not over-the-top sweet.

My crepe pan was wiped with a paper towel, and I brushed a little melted butter. Okay, here I go... I thought, to myself, that the batter seemed little too thick. The first one came out... mangled.

I've made my share of German pancakes, so I decided to gently whisked in a little more milk...about 1/2 cup in total.

There! Much better... I was starting to bond with my crepe pan...
Getting the temperature just right took a few attempts, but medium was the way to go. (By now, my son is drooling and exclaiming how hungry he is-- he loves blintzes, too).

Just like rolling a burrito, I filled the crepe with the ricotta blend (chill it for a while).

This was getting easier (and 45 minutes had gone by...by now, my son is whimpering)


I got eleven filled crepes in all! My son's math is interesting.... 5-3-3 each. Hmmmm, who gets five of these?

I did something differently than Tyler Florence instructed. Why would I need to brown these until golden? I thought they looked fine to me! In truth, my pan was crowded and so I decided to brush the tops with some melted butter, and popped these into a 400F oven for about 7 minutes. My husband popped his head in the back door, from gardening... the pressure is on!


Time to plate...three looks good...


Dust these with powdered sugar, and a dollop of whipped cream...

The sharks are sniffing and circling in... quick! Take photos before yelling "ready"!

Add a little strawberry sauce.... husband is standing by...

These are good! (I preheat my plates, so these are also very hot!)

Look at that filling!

Are these as good as The Little Swiss Cafe? Not quite... the filling needs to be even sweeter and a lot less orange zest.

Still, they were excellent...but I think strawberry preserves would be my favorite way to enjoy these. It's on my grocery list.

Cheese Blintzes on Foodista

Strawberry Blintzes

If you've never had blintzes, brace yourself! These are ...

See Strawberry Blintzes on Key Ingredient.

Friday, April 17, 2009

Garlic Oven Fries

Hi, I'm Debby and I'm a French Fry-aholic. I love french fries.
I am standing on top of a mountain, and shouting out to "The Purple Foodie". This recipe rocks! When I saw this photo posted on Photograzing, I wanted to find out more about the recipe. We love garlic. Garlic is King in my house. I always have fresh garlic...would it be that I live about 45 minutes from the Garlic Capitol called "Gilroy, California"?

I made these, the first time on Easter Sunday. I am so used to cooking alone, so that I can concentrate on reading new recipes. I was so engaged in a wonderful conversation with my brother's lady friend, that I wasn't fully paying attention to three new recipes I was working on. The potatoes turned out delicious-- but they were more like roasted potatoes. I realized, too late, that I should not have used a glass baking dish. We loved them, but I wanted french fries.

During the night, my eyes popped open, with a start (yes, I think of recipes in bed). Duh! I should not have peeled the potatoes ! I also wish that I had used a baking sheet.

Not to worry...

Today, my husband requested one of his very favorite meals-- Sloppy Joe's (not from a can, thank you very much). I decided to make the garlic fries, again. The perfectionist in me wanted to see if I was right about using a baking sheet.

First, the ingredients:

Three russet potatoes, washed. Garlic. Lots of it. I used four colossal cloves of them-- they equal eight in total. Olive oil, sea salt and fresh ground pepper.

Wash and cut the spuds into fourths and then thirds, to equal 12 wedges per tater.

Meanwhile, preheat the oven to 475F (though, I think 450F works fine for me).

In a pan, heat the olive oil and garlic on a very low heat-- we are not cooking the garlic. We are infusing the oil with the flavor of the garlic. Got that? You don't want burned garlic. It's bitter, and it's nasty.


Place the potato wedges in a bowl; then, using a sieve, separate the garlic from the oil.


Yeah, baby... garlic! The garlic, and one Tablespoon of infused olive oil gets tossed onto the potato wedges.

Reserved 5 of the 6 tablespoons of olive oil; this goes onto the baking sheet.

Cover the bowl with plastic wrap, and microwave these for 4 minutes. They are hot, so be careful when you remove the plastic.

In the meantime, mix the cornstarch, salt, pepper and cayenne (warning, if you're a whimp, like me, you might want to leave this out, or use less).


Sprinkle the mixture onto the hot potatoes and very gently mix this with a large spoon. Again, these are hot! Be careful.

The remainder of the olive oil goes onto a baking sheet (not a glass dish, trust me). Evenly spread the potatoes and pop into the oven. These take anywhere from 20-30 minutes to be ready.


The house smelled of garlic, while these were baking. I won't use the corny vampire analogy... suffice it to say that if you love garlic, your nostrils will be filled with the aroma of it.


Halfway through (about 15 minutes) turn these over. Now this is the way to do it! The spuds were a golden brown.

I checked these 10 minutes later, and they were perfectly done. The cayenne had a little "bite". I'm whimpy about heat, because my son said they were perfect.


I served these with Sloppy Joe's on toasted buns, cole slaw with a balsamic vinaigrette.

My husband was very happy...and very thankful. He deserves it. He fixed my car and gave me a new kitchen faucet that I love!

Make these, please! You will thank me. You will thank The Purple Foodie. These are truly the best fries.

Russet Potato on Foodista

Garlic Oven Fries

This recipe comes from "The Purple Foodie" blogsite.

These are ...

See Garlic Oven Fries on Key Ingredient.


Super Sloppy Joes

Sloppy Joe's is a classic comfort food dish that ...

See Super Sloppy Joes on Key Ingredient.

Thursday, April 16, 2009

Chicken Enchiladas "Swiss Chard" (as opposed to "Suizas)


What luck! I mentioned that in my C.S.A. box of fresh veggies, I received some beautiful Swiss Chard. Know what? I've never cooked with them! Yep, it's true. I did a little research, and found out that it's a beet, but grown more of it's leafy greens-- as opposed to the root. I'm going to include this recipe in the "Grown Your Own " round up:


It's pretty, I can attest to that. I searched around, and found a five star recipe from good ole Rachael Ray. But, wait! I stumbled across another recipe, on Food Network, for Swiss Chard Enchiladas-- made with a red enchiladas sauce. I make a great red sauce, if I do say so myself. Intrigued, I read the recipe. Bingo! I had thawed some shredded chicken, thinking I'd either make Enchiladas Verdes or chicken tacos. I had also thawed the last of my corn tortillas, and my cilantro is thriving in my garden-- yippee skippy!

For some reason, I had a hankering for tomatillo sauce. I had a jar of Enchiladas Verde Sauce, from Trader Joe's. I could not make a decision, but after reading three different recipes, I decided to improvise.

First, I washed and rinsed the Swiss Chard; then separated the stems from the leafy greens.


In a large pan, I heated a little bit of olive oil and sauteed some chopped onion, until soft. Then I added 3 minced garlic cloves, until just fragrant. I had a little leftover turkey stock (from making my Leek & Potato Soup), so I tossed in about 1/4 cup and then the chopped stems.
I cooked them for 5 minutes, covered.


Next, I added the leafy greens and cooked them until tender-- about 5 minutes. I took a taste...
Know what? I like Swiss Chard! It definitely reminds me of spinach...and I love me Spinach!


I was still skeptical about using these lovely greens in a Mexican enchilada dish-- but I was feeling adventurous, and I went for it.

I opened the jar of salsa verde sauce and set aside about 1/3 cup and put the rest into a sauce pan. I decided to add about 1/2 cup of turkey stock (you could use chicken stock or water). I let that simmer a bit.

I added the thawed shredded chicken and tossed it around to heat it through.


After tasting it, I decided to add some cumin and chili powder. How much? I'd guess about 1 Tablespoon of cumin, and a scant Tablespoon of chili powder. Aha! I have a secret weapon! In my freezer, I keep unused chipotle chilis (roasted jalapenos) for moments like this. I cut about a 1-inch piece, chopped it up and tossed that in. Now we're talking!

Next, I had about 3 Tablespoons of leftover cream cheese, cut up, so I added that-- and about 1/2 cup of the Monterey Jack cheese. I was starting to feel very happy...

I preheated the oven to 350F and sprayed a baking dish with non-stick spray.

Here's a neat trick that I just learned...have you ever tried to roll corn tortillas, and they split? Most recipes say to cook the tortillas in oil to soften them. I didn't want to! I rinsed the corn tortillas with some hot water, then placed them on a dish (separated...not stacked) with a paper towel on top. I steamed them for about 2 minutes, and they were soft and pliable!

The reason that I say "don't stack them" is because that's what I did-- the first go-round. They stuck together. It wasn't pretty.

I poured about 1/3 of the sauce on the bottom of the baking dish. Next, I dipped one corn tortilla in the remaining sauce; I added a spoonful of the chicken and chard mixture (using a slotted spoon), and then a handful of cheese. I don't measure...

I rolled the tortillas and placed it, seam side down. I eventually decided that there was no need to dip the tortillas in the sauce. They were very soft, from being steamed.

Last, I added poured the rest of the salsa verde sauce over the enchiladas. Then I added the cheese-- in total, I used 1 pound of cheese.


Next, foil was placed on top and baked for 15 minutes; then the foil was removed and baked until the cheese was bubbly-- about 12 more minutes.


I wanted to make a salad, and I remembered that I had shredded cabbage. Since I wasn't going to make tacos, I had a brain storm. I still had leftover balsamic vinaigrette, from the Spinach & Strawberry salad that I made on Easter Sunday. Wow! The vinaigrette is perfect for making a mayonaisse-free cole slaw. I added some shredded carrots, and dinner was ready.


I cut fresh cilantro, from my herb garden. I chopped the cilantro and added it to some Light Sour Cream (to offset the cheese...) and some fresh lime juice. This made a nice garnish to the enchiladas.

I'd say that from the start of prep time, to being out of the oven, took about an hour-- fortunately, the shredded chicken was already made.


This was delicious! I couldn't really taste the Swiss Chard. Personally, I think this is a great way to sneak veggies into dishes for very picky eaters. You can leave out the greens, though. This is still a delicious recipe.

I'm so looking forward to the leftovers. For some reason, enchiladas taste even better, the next day. That is, unless my 6'3 Pirahna Son doesn't devour the rest on one of his midnight raids.

I might have to rig some fishing line and bells to my refrigerator. I wish I had his metabolism. He can eat anything, and not gain weight.

Chicken & Swiss Chard Enchiladas Verde Recipe``

I created this dish, after receiving some fresh Swiss Chard ...

See Chicken & Swiss Chard Enchiladas Verde Recipe`` on Key Ingredient.


Cole Slaw with Balsamic Vinaigrette

See Cole Slaw with Balsamic Vinaigrette on Key Ingredient.

Breakfast for Two, Fresh & Organic and very Spring


My husband and I are on vacation for the rest of this week-- well, we are on a "stay-cation". My husband deserves extra T.L.C. and pampering, because he is going to replace the radiator on my Jeep. That will save us hundreds of dollars in repair bills. I tell my hubby that women find Mr. Fix-It's to be sexy. He thinks that's silly, but c'mon, ladies... isn't it wonderful when your husband can fix almost anything? I'm so blessed!

My plans, to show my appreciation, are to make his favorite meals. My first inspiration came to me, when I picked up my box of fresh, organic vegetables from my local co-op (www.carmelvalleycoop.org). Every other week, I pick up a box of locally grown vegetables. Last time, I received a beautiful bottle of extra-virgin olive oil-- that I used to make a fantastic balsamic vinaigrette.

What is a C.S.A. box? "Community Supported Agriculture Box". It's a wonderful way to support your local grower, and to feed your family with organic, sustainable products.


This week, I found a really special (and unexpected) treasure-- fresh, fertile and free-range eggs. I was on a waiting list for fresh eggs, since they are very limited. I got so excited, that you might have thought I'd found money!


I cannot think of a time I've eaten a green egg (except for the time I stored an Easter egg for weeks, and then tricked my older brother into eating it). These beauties deserved to be enjoyed to their fullest.

My German heritage kicked into full gear. Some of my fondest memories of visiting Bavaria are the traditional bed & breakfast meals of soft boiled eggs. I absolutely adore eating my eggs soft boiled, but they must be served in an egg cup.

I love kitchen gadgets, and I use them. One of my often-used gadgets is a Salton Egg Poacher, that I bought many years ago, to cook my soft boiled eggs. I love it!


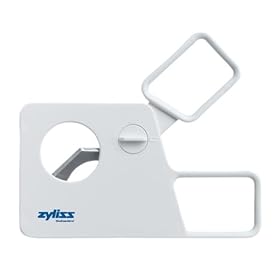
I also have a gadget to cut the tops off my soft boiled eggs-- no more tapping the top of the egg and peeling it. This wonderful gadget, cuts the top of the egg in one firm blow. It's from Zyliss and it's called an "egg topper".To make this breakfast special, I decided to remove (from a display case) an Italian porcelain breakfast setting that my mother gave to me, many years ago. My mother was a very sentimental person, who enjoyed pretty things. I've inherited an appreciation of her fine things, because they have been stored in my home since she passed away in 2003.


I saved her hand-written note that was tucked inside the porcelain jam jar that said "Breakfast for Two". Perfect! I've never used this table setting, and it's high time that I do exactly that:


My 20-year old son is at work. Husband and I enjoyed a quiet breakfast together. He has learned to appreciate the way I serve soft boiled eggs as much as I do.


The yolks were a beautiful deep yellow color. According to the newsletter that came with my eggs:
"...another plus is the renewed growth of the grasses and wildflowers. This is a bonus not only for the chickens-- they love the tender greens-- but for us: you will notice that the yolks are bright yellow."


I have two more eggs left. I also have Swiss chard, cauliflower, red cabbage, sugar snap peas and broccoli that is waiting for me to decide how to enjoy them. Time to surf the food blogs-- but, first... time to jump into my bathing suit. The sun is out, and I've got a lap pool waiting for me.

What a wonderful way to enjoy Spring!

More signs of Spring... our wisteria buds three weeks ago...

Just this week, they are blooming!
Three weeks ago, our rose bushes were budding...


This week, they are showing signs of opening into beautiful rose flowers. I love roses!

As a little "teaser", my tree rose gave me one flower that I didn't notice for a couple of days.

Life is good.