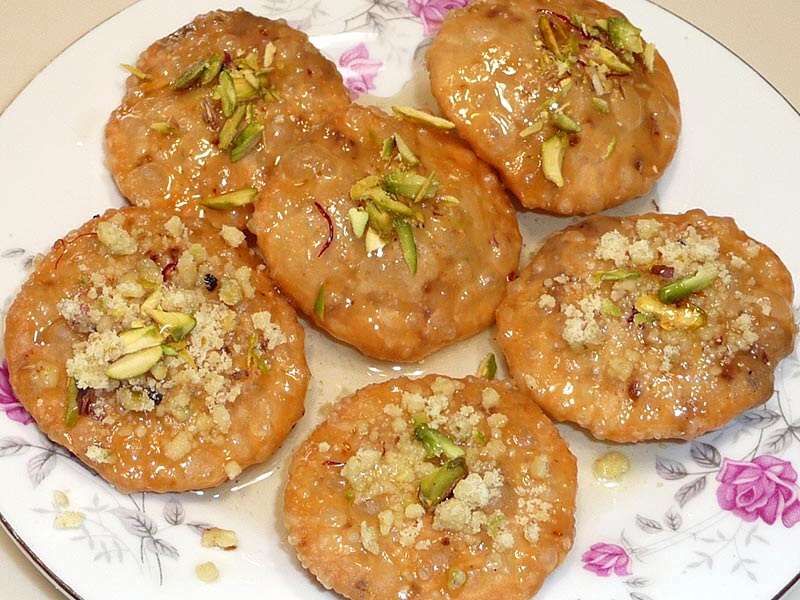
Mawa Kachori is an exotic dessert. This is a delicacy from state of Rajasthan. Rajasthan is known for their rich food and culture. Pastry filled with aromatic mixture of mawa and nuts makes a very festive dessert.
This recipe will make 18 Kachories.
Ingredients:
Crust
1cup all-purpose flour (maida, plain flour)
2 tablespoons clarified butter (ghee)
Approx. 1/2 cup of lukewarm water as needed
Filling
1/2 cup heavy cream or whipping cream
1 cup milk powder
1/4 cup mixed nuts (almonds, pistachios coarsely ground)
1/4 teaspoon crushed cardamom
3 tablespoon sugar
Note: If you are using mawa use ¾ cup of mawa instead cream and powder
Oil to fry
Syrup
1cup sugar
1/2 cup water
1/8 teaspoon crushed cardamom
Few strands of saffron
Method
Crust
Mix flour, and clarified butter in a bowl, making firm soft adding water slowly as needed. Knead the dough until the dough becomes soft and pliable.
Set the dough aside and cover it with a damp cloth. Let the dough sit for at least ten minutes.
Syrup
Boil the sugar and water on medium heat, as sugar comes to boil add saffron, and cardamom on medium heat until syrup is about one thread or 220 degrees (Fahrenheit) on a candy thermometer. Set aside.
Filling
Mix the cream and milk powder in a frying pan. Cook on medium heat until it becomes consistency of soft dough, this should take about 3-4 minutes. Stir continuously so the mixture does not burn on the bottom of the pan. This mixture is known mava.
Next add nuts mixture, sugar, and cardamom powder to mawa. Mix together well and cook for about 2 more minutes until mixture is consistency of soft dough. Keep aside.
After cooling, the mixture will become drier but still should be lightly moist.
Making Kachories
Knead the dough for a minute.
Divide the dough into about 18 equal parts.
Roll each ball into about 2-inch diameter.
Take one of the rolled dough in your palm and place about 1 tablespoon of filling in the center. Pull the edges of the dough to wrap the filling. Proceed to make all 30 balls.
Let the filled balls sit for 3 to 4 minutes before pressing.
In the frying pan heat the oil on medium high, frying pan should have about 1-1/2 inches of oil.
Set the filled balls on a clean and dry surface with the seam facing up. Using the base of your palm, slowly flatten them into about 3 inches circle.
To check if oil is ready put a little piece of dough in the oil. It should sizzle, and come up slowly.
Slowly drop the Kachories in the oil, do not over crowd the kachories in frying pan, fry them on medium heat.
After they are puff, slowly turn them over.
It will take about 5-6 minutes to fry. Fry until golden-brown on all sides.
If the kachories are fried on high heat, they will get soft and will not be crispy.
Serving
Just before serving drizzle the kachori with about 2 tablespoons of hot syrup. Garnish them with left over filling or sliced pistachios.
Banana Puries are delicious fried Indian puffed bread. Puries have richness of banana flavor enhanced with cardamom. Banana Puries are good for festive occasions and holidays. These can be served for breakfast or as a snack. Puries are especially good for picnic or to take for travel.
This recipe will make about 40.
Ingredients:
1/2 cup ripe mashed banana (about 8” long banana)
1/2 cup sugar
1 tablespoon melted ghee or butter
1/8 teaspoon crushed cardamom powder
Pinch of salt
3 tablespoons coarsely ground almonds about 18 almonds
Approx ¾ cup whole-wheat flour
Approx ¾ cup all purpose flour
Oil to fry
Method
Peel and mash the banana, add the sugar, almond, butter, salt and cardamom mix it well.
Add whole-wheat flour and all-purpose flour to the banana mix and make a firm and smooth dough. Keep it aside for about 2 hours.
Grease the fingers and knead the dough for a minute and divide in four equal parts.
Roll them into 8” diameter and cut them in about 2” diameter, using a cookie cutter.
Heat the oil in a frying pan on medium heat. To check the heat if oil is ready put one piece of dough in oil, dough should sizzle and come up slowly.
Fry the puries few at a time don’t over crowd the frying pan. Puries will puff and fry them till they are dark brown from all around. It will take about 2 minutes to fry every batch.
Take them out over paper towel so it can absorb the extra oil.
Puries are ready.
Notes:This is good recipe for vegan by replacing the butter with oil. Puries can be served hot or eaten at room temperature. Banana Puries can be stored for a week; you don’t need to refrigerate them.
In my last post, I shared how I made a Savory Tomato Jam. The recipe for Chicken Breasts with a Walnut Aillade comes from "Two Fat Ladies". If you've never watched their show, it's quite interesting. I've caught a few episodes on the Cooking Channel, and their British humor is quite entertaining. So, what is an aillade sauce? It's a garlic sauce. I loved the simplicity of the sauce, that is the star of this show. I thought this would be a perfect work night dinner-- and it was. Within the last minutes of making this dish, I was inspired to top the chicken off with some tomato jam. It was a great idea, my husband said. He loved the whole dish.
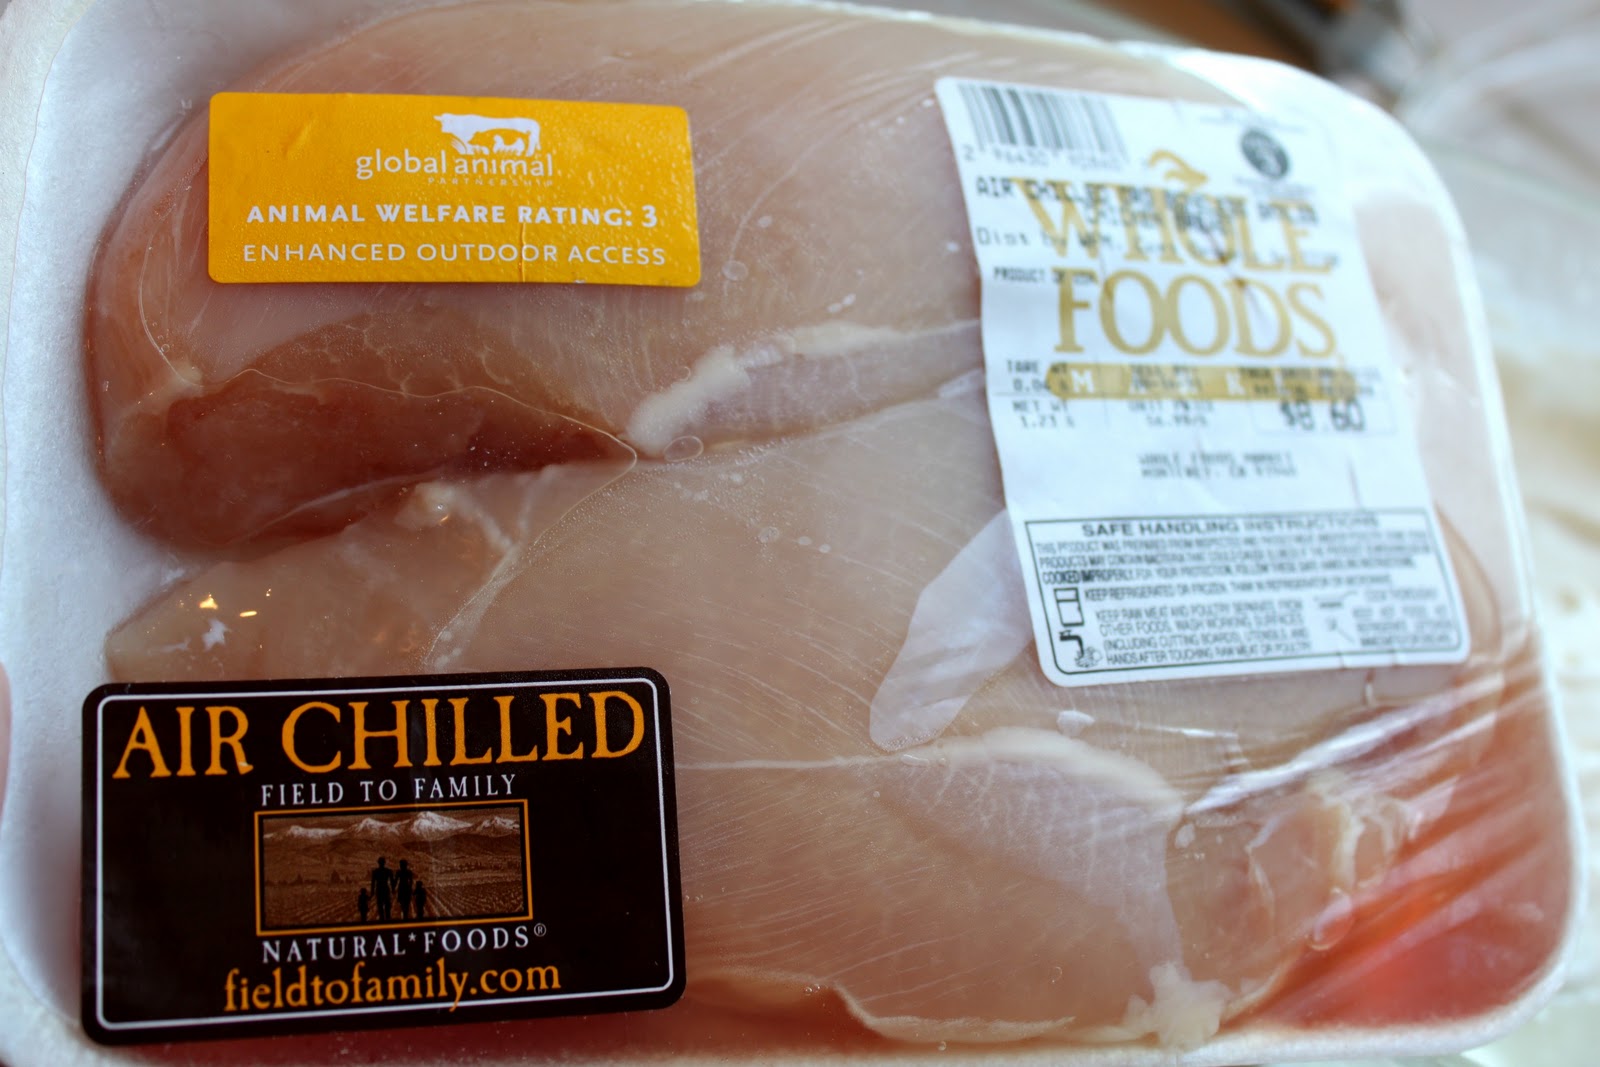
Whole foods had a terrific sale on free-range boneless chicken breasts, so I stocked up and froze a few packages. I thawed the chicken, in the fridge, the night before. The chicken is marinated in plain yogurt with fresh lemon juice-- for about 30 minutes.
I usually keep a container of Fage Greek Yogurt on hand. I love how thick it is, and the non-fat version is excellent. But, any kind of plain yogurt will work.
I whisked in the juice of one fresh lemon.
I seasoned the chicken with just salt and pepper and set them into the yogurt and lemon juice...
These marinated for about 30 minutes, so the sauce can be made, next.
The sauce is very simple to make. (A food processor plays a helpful role). We begin with two ounces of fresh garlic. (I used two large cloves.) I always keep shelled walnuts in the freezer-- grab a large handful, or about 2 1/2 ounces. Add about one Tablespoon of water, and grind the walnuts. Season the ground walnuts with some salt...
...add some pepper...
You need about 1/2 cup of walnut oil. This oil is a bit pricey (I found mine at Whole Foods). You could use olive oil, though. I think it would be a good substitute.
While the processor is running, slowly add the walnut oil until you have a thick sauce-- almost like mayonnaise.
Add a handful of chopped fresh parsley, and there you go! Set the sauce aside...
I decided to warm about one cup of tomato jam.
Heat some oil in a pan, and pan fry the chicken on each side to sear.
NOTE: I forgot to wipe off the excess yogurt. Had I done so, I would have gotten a nicer sear. Ah, well.
Spoon over the aillade (walnut sauce) and cook over low heat until chicken is done (just a few minutes more).
I'm on a polenta kick, as of late. I make mine with chicken stock, Parmesan cheese and sometimes a little mascarpone cheese or either heavy cream or half and half. At first, I thought I'd make mashed potatoes, but the polenta called my name. So, there's the final dish. I think it took about thirty minutes to make.
I think the tomato jam adds such a beautiful color. Don't you?
VERDICT: The sauce is excellent. It has a lot of garlic, and I actually cut back on the recommended about in the original recipe. So, be forewarned. (I've stored the remaining sauce in an air-tight container.) I think the sauce would be excellent on fish. I also think it would be delicious on pasta, too. I like marinating chicken in yogurt, as I think it tenderizes the meat. The lemon flavor was a bit strong, I thought, so I think I'd add half the amount of lemon juice-- I even think lime juice would be a nice substitute. I loved the different textures in each bite-- the creamy polenta, tender chicken and then the chunky bite of tomato jam. Wow! My husband raved about this dinner, and yes, I would make this again. It's super fast, and if you love garlic, you will love this recipe. It's actually quite healthy. (Well, maybe the polenta is a stretch, if there's mascarpone or heavy cream in it!)
Tomato Jam? That's what my husband's reaction was, when I started making this on a Sunday afternoon. I can understand why he couldn't bond with the idea of tomato jam on toast. I didn't create this recipe for toast and jam. I was inspired to make a Savory Tomato Jam out of pure lust. You see, there's a local restaurant that served a dish that I fell in-love with. It was a lemon-rosemary marinated grilled chicken breast, served over a risotto cake with tomato jam. I loved it! But, that special is no longer on the menu, and I was pining for more.
I spotted these beauties at Whole Foods, and it was already October. At $3.99 a pound, I grabbed a couple of baskets and decided that these were destined for my own version of tomato jam. I did a lot of surfing the internet, but most of the recipes I saw had heat from hot pepper-- and I didn't have a jalapeno in my fridge, anyway. My taste buds were leaning towards more of a combination of sweet and sour. I reviewed my recipe for Peach Chutney, and then I jumped in and started to throw things together:
I had two pints of these beautiful organic tomatoes. After washing them, I added them to a non-stick pot, and seasoned them with coarse salt & pepper. I decided to use brown sugar-- about a 1/2 cup.
I added about 1/4 cup apple cider vinegar. White vinegar would work, too.
I decided to add one small diced onion to the mix and enough water to cover the tomatoes. I didn't measure, but I'd guess about 2 cups of water. I brought the tomatoes to a boil, and then down to a low simmer. The tomatoes were releasing their pectin. After a few minutes, I gave the jam a taste. To me, it tasted a bit too sweet-- and one dimensional-- for me (hence, I recommend using 1/4 cup of sugar to start with).
I decided to add some thyme, red pepper flakes, and the juice of 1/2 fresh lemons. Much better!
I let the jam simmer for about 20 more minutes. This photo makes the pot look like I burned the jam. I almost did, but I got it in the nick of time. Lesson learned: pay very close attention when reducing something with sugar in it! I had already been in the middle of canning apple sauce, so I poured the tomato jam into a sterilized jar and the the top sealed with a reassuring "click". I stored this in the fridge, and two weeks later, I made this recipe with it:
This is a pan-fried chicken breast, served over polenta with a fantastic sauce (I will share that next). The tomato jam was the perfect topping, for this dish. In fact, my husband raved about how good the tomato jam tasted-- it was his favorite part of the dish. There's still 1/2 jar of this tomato jam left, and I have another idea...I've shared this chicken recipe, and you can view it here. I decided to, first, post how I made the tomato jam, so that my post wouldn't be too long. It's a delicious condiment, with just the right balance of sweet and sour. I thinking that adding more heat with a jalapeno could work, too. If you've never tried cooking down tomatoes, as a condiment, I encourage you to do so. I plan on making more of this recipe, so that I can enjoy tomatoes year-round.
I've made many pot roasts in my life. I've made them in my slow cooker, pressure cooker and in the oven. I've been reading The Pioneer Woman's food blog for three years. I even bought her cookbook, when it first came out-- and I've posted many of her recipes. Every so often, Ree will post something with salad greens... or vegetables....or soups. She's not always about comfort food, you know! However, when I recorded an episode of PW's new Food Network show, and I watched Ree make her Perfect Pot Roast... well, my mind was set on making it. However, I didn't exactly follow Ree's recipe. I will tell you, in advance, that this is the best pot roast that I've made so far!
Behold, a nicely marbled piece of 5 pound chuck roast... (season with salt & pepper)
Three yellow onions and whole carrots...
A Dutch oven, in my opinion, is my favorite way to braise. I liked Ree's idea of cutting the onion in half, instead of chunks. With a little olive oil, just give them a nice brown, remove and set aside.
Add a little more olive oil, and toss in the carrots (cut in really large chunks). Give those a nice sear, and here's my own touch-- in the last 30 seconds, add two whole cloves of garlic. Set those veggies aside...
Add some more oil. and keep that Dutch Oven hot!
Now, sear the meat. Hear that sizzle!
...and give that meat a beautiful sear on both sides, and all around.
Remove the meat.
I'm lucky enough to have an herb garden, where I could cut three sprigs of fresh rosemary and thyme. We're about to build some flavor for the braising liquid.
Ree tosses her herbs into the broth. I wanted to tie them, so I could easily remove them. (I don't particularly care for bits of rosemary floating around in my gravy). I have kitchen twine, but I save the rubber bands from when I buy celery. I think they're easy to use, and then I just toss them.
I decided to deglaze all that beautiful brown bits with some red wine-- oh, about 3/4 cup.
I added about 3 cups of beef stock. I had to add something that Ree did not...
Tomato paste. I love that richness and depth of flavor and color it adds to sauces and braising liquids.
TIP: At a restaurant supply store, I buy a package of those small plastic containers that you find in take-out foods. I freeze 1-2 Tbsp. portions of tomato paste, once I open a can and only use a portion of it. I also freeze leftover chipotle peppers and pesto sauce.
With a sharp knife, I carefully cut about 1 Tbsp. of frozen tomato paste...
...then, tossed it into the braising liquid.
Please pardon the out of focus Tablespoon of Worcestershire sauce. Again, this was another layer of flavor that I added to Ree's original recipe. Trust me, this adds a lot of flavor! Now, give it a taste... adjust the seasonings with more salt and pepper, if you feel it needs it.
Now, add the meat back into the pot. Toss in the two garlic cloves.
Set the tied herbs into the liquid. Tuck those beautifully caramelized carrots and onions along the sides... nice, and cozy.
NOTE: In reading the many comments people left about pot roast, some people said that the carrots should only be added at the end, lest they become mushy. I set aside half of the carrots, to test that theory. I'll let you know.
Now, add enough beef stock so that the liquid comes up to about halfway of the meat. Put the lid on, and put into an oven, preheated to 275F. Relax, and let this cook low and slow for 2-3 hours.
Of course, you could put all of this into a slow cooker. On a lazy Sunday, I'm content to use a Dutch Oven. It's just my preference.
So, it's been about 3 hours, and I have to tell you-- the pot roast smells so good! I decided to add the remaining carrots and let this go for another 45 minutes.
Pot roast. From scratch. No onion soup mix. This is home cookin'!
Toss away the herbs. They've done their job well.
The meat is very, very tender. NOTE: I recently watch Anne Burrell (Food Network/Secrets of a Restaurant Chef) make a pot roast, and she ties it so that slicing the meat is much easier. In the future, I'm definitely going to do this.
Overall, the meat was easy to slice. I debated thickening the braising liquid into a thick gravy. But, I decided not to. Truth be told, I was hungry!
I made these Creamy Yukon Gold Mashed Potatoes, earlier in the day. My secret to terrific mashed potatoes is to use a food mill, and I don't peel the potatoes. I stir in a combo of cream cheese and butter, and some heavy cream. Yes, the fat gram police aren't pleased. Once in a while, I say, live it up... and these potatoes are the best you can make. I simply heated these in the last half hour that the pot roast was cooking-- right next to it. They were hot, and steamy. Serve the pot roast, and veggies and gravy right over a mound of creamy mashed potatoes. Dig in!
VERDICT: Seriously, this is the best pot roast I have ever made! Let's start with the sauce-- the red wine, tomato paste, garlic and Worcestershire sauce kicked up the flavor a lot. The meat was tender. I loved the caramelized large chunks of onion. Yummy! The carrots were not mushy. They were sweet, and I couldn't tell the difference between the carrots I cooked at the beginning vs. the end. The rosemary and thyme herbs were perfect, and I much preferred not having them in my sauce. I did not regret that I didn't make the gravy thicker with flour or cornstarch. The next day, the pot roast was even better! Sadly, there were not enough leftovers to make pot roast soup. With all due respect to The Pioneer Woman, my additions to the her recipe were an improvement. We loved this recipe, and I can hardly wait for that first California frosty cold winter night to make this again.
A printable recipe card, with my adaptions, is at the end of this post.
I need to announce the winner of the Tate's Bake Shop Giveaway. Using random.org, the winner is....
Congratulations, Simple Simon! Please email me at foodiewife@gmail.com with your shipping address, so Tate's Bake Shop can send your prize.


