Wednesday, August 31, 2011

Besan Kay Ladoo Cooking Recipes by Chef Zubaida Tariq


Besan kay ladoo can be make in several ways. Here is a awesome and simple recipe of ladoo you gonna love them. Enjoy!


Ingredients

  • Gram flour 2 cups

  • Plain flour 1 cup

  • Char maghz 1 cup

  • Coconut powder 1 cup

  • Pistachios and almonds 1 cup

  • Small cardamoms 8

  • Fresh cream 1 packet

  • Sugar 1-1/2 cup

  • Ghee/oil 1-1/2cup


Cooking Directions

  • Boil almonds and pistachios then chop them finely.

  • Grind small cardamoms with sugar.

  • Heat oil in a pan add cardamom powder, gram flour and plain flour.

  • Saute them until golden brown.

  • Allow to cool and add coconut powder and sugar in it.

  • Cook well and turn off the heat.

  • Add char maghz and cream in the mixture.

  • Then make small ladoo of the mixture.


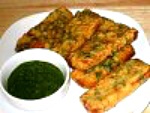
Bread Pakoras Cooking Recipes by Chef Manjula


Spicy hot bread pakoras are great as an appetizer, finger food for any type of the gathering, and a tasty compliment for your afternoon tea.


Make 12 pieces.


Ingredients:

  • 4 slices of firm white bread
  • 1 cup gram flour (besan)
  • 1 tablespoon rice flour
  • 1 teaspoon salt
  • Pinch of asafetida (hing)
  • 1 teaspoon cumin seeds (jeera)
  • 2 finely chopped green chilies
  • 1/4 cup chopped cilantro (green coriander)
  • 1/2 cup + 2 tablespoons of water
  • Oil to fry


Method:

  • Remove the crust from all sides of the bread.
  • Slice the bread lengthwise into 3 equal parts.
  • Mix all the dry ingredients together: Gram flour (besan), rice flour, asafetida, cumin seeds, and salt. Rice flour adds to the crispness.
  • Add the water slowly to make a smooth batter. (Batter should be the consistency of pancake batter or dosa batter)
  • Next, add the green chilies and cilantro. Mix well.
  • Heat the oil in a frying pan on medium high heat.
  • Frying pan should have at least 11/2 inch of oil. To check if the oil is ready, put one drop of batter in the oil. The batter should come up but not change color right away.
  • Dip the bread slices in the batter one at a time and slowley drop into the frying pan. 
  • Fry the pakoras in small batches. The pakoras will take about 4 to 5 minutes to cook.
  • Turn them occasionally. Fry the pakoras until both sides are golden-brown.
  • Repeat this process. The crispy, delicious pakoras are ready to serve.

Tips:

  • If oil is too hot pakoras will cook too fast and will not be crispy; if oil is not hot enough pakoras will be greasy.
  • You may have to adjust the heat as needed while cooking.


Variations:

Use 1/4 cup of chopped spinach or 2 tablespoons of chopped fenugreek leaves as a substitute for the chopped cilantro.

Serving suggestions:

  • The bread pakoras are best when dipped with a fresh cilantro chutney or tamarind chutney.
  • Pakoras taste best when they are served hot.
  • Pakoras can be made one day in advance do not refrigerate. When ready to eat, place on a cookie sheet and heat in the preheated oven on 300 degrees.

Watch Bread Pakoras Cooking Recipes by Chef Manjula


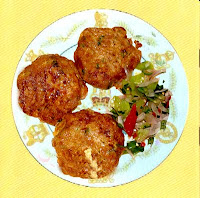
Aaloo Kay Kabab Cooking Recipes


Aaloo Kay Kabab recipe can be served as appetizers, snacks, as a side dish or even can be placed in bugers.


Ingredients

  • Potatoes One pound/Half Kg. 

  • Fresh coriender(hera dhania) One bunch. 

  • Salt to taste. 

  • Red chillies 2 tea spoon. 

  • Green chillies two to three medium. 

  • Onion one small. 

  • Corriander ground(Pisa houa shookha danya) one tea spoon.


Preparation 

  • Boil potatoes. 

  • Mash them and add salt, red chillies and coriender ground. 

  • Cut onions in very small and thin pieces,but chop them they will bitter the taste of kababs. 

  • Also cut or chop green chillies and cut hara dhanya. 

  • Add them into the potatoes and mix all ingredients well. 

  • Then make small kababs and dip them into the egg and fry on low heat till they turn golden brown. 

  • Now serve them with cucumber, tomatoes and onion salad with lemon juice added and immli ki chatni. 

  • Fry for few minutes. 

  • Now add yogurt in it and cook for 5 min. 

  • After this add lemon juice and green chillies in it and remove from heat. 

  • Place it in the dish and garnish with hara dhanya and garam masala. 

  • Serve hot with garam parathas. 


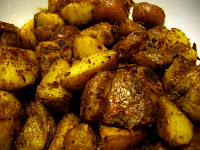
Aachari Aloo Cooking Recipes


Aachari Aloo recipe is a quick and easy potato dish with the bold flavors of pickling spices.


Ingredients

  • Potatoes 1/2 kilo 

  • Onion 1 (sliced) 

  • Red chillies 1 tsp 

  • Salt 1 tsp 

  • Garam masala 1/2 tsp 

  • Lemon juice 1/4 cup 

  • Zera(cumin seed) a pinch 

  • Hara dhina(green corriander) 1/4 cup 

  • Green chillies 2 

  • Yogurt 1/2 cup 

  • Kalonji(carom seed) 1/2 tsp 

  • Saunf(fennel seed) 1/2 tsp


Preparation 

  • Boil potatoes and after this cut them in small cubes. 

  • Mix red chillies, salt, onion in it. 

  • In another pan heat 1/2 cup of oil. 

  • Add kalonJi and saunf in it. 

  • After this add the potatoes. 

  • Fry for few minutes. 

  • Now add yogurt in it and cook for 5 min. 

  • After this add lemon juice and green chillies in it and remove from heat. 

  • Place it in the dish and garnish with hara dhanya and garam masala. 

  • Serve hot with garam parathas. 


Sunday, August 28, 2011

Bisquick Coffee Cake | Bisquick Coffee Cake Muffins | Bisquick Coffee Cake Recipe 2011

bisquick recipes coffee cake


Bisquick Coffee Cake Cherry


There are a couple of childhood memories that seem so simple, but they have a huge impact on us throughout our lives. It seems that my heart always wanted memories revolve around food, especially with my mother in our small, cozy kitchen cooking. One of the favorites that my mother was using a simple Bisquick coffee cake made ​​with a kitchen staple, Bisquick. I still remember the big bright yellow box with the glorious-looking pancakes on the cover. Sides and back of the box were recipes for pancakes, biscuits, strawberry cake and coffee cake amazing.


bisquick apple coffee cake


Bisquick Coffee Cake Topping


Bisquick coffee cake is one of those versatile cakes served almost every time. In fact, in my book of recipes Bisquick recipe is found in the breakfast department. My mother used to make an after-school snack or whip one up when the company drops by unexpectedly. This is a true comfort food, serve as a hub for many conversations around the kitchen table in a cold winter afternoon. The recipe is so simple and fast that literally can be mixed in the oven while you chat with your company, then served warm and friendly right from the oven.


cream cheese coffee cake


Bisquick Coffee Cake With Fruit


Unfortunately, the recipe is no longer the box was found has been replaced by another. But I own a copy of Betty Crocker Cookbook Bisquick field, with the famous coffee cake recipe and many others. Bisquick is a truly versatile and can also be used in pies and casseroles, so this book is much more than dessert recipes.


Grab The Bookmarketer For Your Site

Saturday, August 27, 2011

San Francisco Garlic Fries - Made Lite (Bon Appétit )

This recipe was published in the August 2011 issue of Bon Appétit Magazine. Bon Appétit  describes this recipe as "Our lighter take on the Gilroy Garlic Fries at the San Francisco Giants' AT&T Park forgoes the deep fryer in favor of a hot oven." My hometown of Monterey, California is no more than a 30 minute drive to Gilroy, California-- home of the Garlic Festival.  Drive another 1 1/2 hours north, and I'm in San Francisco.  I've never been to the AT&T Park, so I've never experienced these particular fries.  However, I'm a garlic lovin' fool and I am always on the lookout for baked oven fries.   Fries are one of my guilty pleasures, you see.   While I'm not 100% thrilled with my final photos of these baked fries (we were hungry and I didn't want these to get cold), I still wanted to share this fast and simple way of making garlic fries that are really delicious-- and I didn't miss the deep-fryer version of fries that I've been known to make at home (about once a year):


 I scaled the recipe in half by using two Russet potatoes, scrubbed clean and cut into planks.

Toss potatoes with 2½ tablespoons oil in a large bowl and season with salt and pepper.

Arrange in a single layer on baking sheet. Roast the potatoes, turning occasionally, until browned and tender, about 30 minutes. Increase heat to 500°. Continue roasting until fries are deep brown in spots, about 5 more minutes.

Meanwhile, whisk  ½ tablespoons oil, garlic, and parsley in a large bowl. 
NOTE: My garden flat-leaf parsley is finished for the season, so I used my curly parsley. Just a minor adaption...

Add hot fries, season with salt and pepper, and toss to coat.

 I served these fries with a Grilled Mar-A-Lago Turkey Burger.  Double less guilt!

VERDICT:  Hubs and I both enjoyed these baked fries.  What I liked about this recipe was tossing the baked fries in with a bit of oil and freshly minced garlic.  I also didn't need to pre-cook the fries in the microwave , as with my earlier Garlic Oven Fries.  I think it would be fun to use some seasoning salt and even more garlic.  Super easy.  Excellent recipe.

A printable recipe is at the end of this post.

Saturday, I'm out the door bright and early for a pasta making class.  I get to bring my Atlas pasta maker, and I will to learn how to make ravioli. My camera battery is charging, and I look forward to sharing that with you.


San Francisco Garlic-Fries Made Lite

        <p>This recipe was printed from Bon Appétit | August 2011<br />This is BA&#8217;s lighter take on the Gilroy Garlic Fries at the San Francisco Giants&#8217; AT&#38;T Park, that  forgoes the deep fryer in favor of a hot oven.  These are very quick and ...    

        See San Francisco Garlic-Fries Made Lite on Key Ingredient.    


Wednesday, August 24, 2011

Scallops Gratin, Ina Garten Style

A couple of weeks ago, I tweeted that I was having the ho-hums in the kitchen.  I just couldn't muster up any kind of enthusiasm with cooking.  That happens to me, every so often.  I'm sure I'm not the only one.  Last weekend, I sat outside to enjoy a sunny afternoon in our backyard.  I dug out a few of my Tyler Florence and Ina Garten cookbooks and began to revisit them.  The dry spell of cooking inspiration was broken!

I had invited my husband for dinner at Chez Debby's, that Saturday night.  (This is my way of saying I would be cooking at home, for Date Night, and he'd be doing all of the cleanup). Truthfully, I am very lucky that my husband does most of the kitchen cleanup on a regular basis.  Chez Debby's is affordable cooking, but I try to kick things up a few notches so that it looks like restaurant quality.  Ina Garten to the rescue:

Whenever Whole Foods has their special sales, I stock up-- especially when it's Sea Scallops on sale for half price!  My favorite way to prepare scallops has been to quickly sear them.  This time, I wanted to try something different and Ina's Scallops Gratin sounded perfect.

I had frozen the scallops.  My "quick thaw" method never involves the microwave. Instead, I rinse them with warm water to separate them, and then soak them. In about 15 minutes, or longer, they are good to go.

 Pat them very dry, and remove the muscle (the "feet") that it sometimes hanging on to the side.

 These are a decent size, and the price was just right.

I made a couple of tweaks to Ina's recipe.  I chose not to use Prosciutto di Parma because I didn't have any.  I also decided to add fresh tarragon (which is growing out of control in our garden).  I love tarragon.  Ina also lists Pernod, but I don't have that on hand.  I wasn't going to invest in a bottle, just for this recipe.

Tarragon and seafood are meant for one another. I love the really mild notes of licorice.

This is a very easy recipe to make, actually.   I'm going to make delicious garlic-butter topping, and then I'm going to fold in Panko crumbs.  Here's how:

To make the topping, place the butter in the bowl of an electric mixer fitted with the paddle attachment (you can also use a hand mixer).With the mixer on low speed, add the garlic, shallot, tarragon, prosciutto*,

...parsley*, lemon juice, Pernod*, salt, and pepper and mix until combined. With the mixer still on low, add the olive oil slowly as though making mayonnaise, until combined.
*I didn't use these ingredients.
Fold the panko in with a rubber spatula and set aside.
NOTE: Don't use bread crumbs! Panko crumbs are much easier to find, nowadays. Check the international aisle of your supermarket.  Panko gives a beautiful crunch to this recipe, and the crumbs would become soggy.

Preheat the broiler, if it’s separate from your oven. Place 1 tablespoon of the wine in the bottom of each gratin dish.

 Distribute the scallops among the 3* dishes.(NOTE: I scaled this recipe for two.)

Spoon the garlic butter evenly over the top of the scallops.
Nice!

Since the oven was already preheated, I decided to roast fresh asparagus with salt, pepper and a little olive oil. I like to use my cast-iron skillet for ease.  

Bake for 10 to 12 minutes, until the topping is golden and sizzling and the scallops are barely done. If you want the top crustier, place the dishes under the broiler (which I did) for 2 minutes, until browned.

Finish with a squeeze of fresh lemon juice and a sprinkling of chopped parsley and serve immediately with crusty French bread (which I didn't have, but I wish I had...the sauce is amazing!)

For those of you who watch "The Barefoot Contessa", you've seen many episodes where Jeffrey walks into the kitchen to see what's cooking.  Craig is my Jeffrey, and this meal was prepared with a lot of love. The table was set, soft music going and just the two of us, and two glasses of chilled white wine. Best of all, this really came together in about 45 minutes.

VERDICT:   I loved this dish.  The scallops were tender, and not overcooked.  How can you go wrong with wine, butter and garlic?  I'm glad that I added tarragon, because it's one of my favorite herbs.  I didn't miss adding the Prosciutto at all.  As for my Jeffrey Craig, he really loved this dish.  He said it looked and tasted just like a fancy restaurant. For me, that's an ultimate compliment.  This recipe, in fact, reminds me a lot of Ina's Baked Shrimp Scampi that I made quite a while ago.  The panko topping is really good, and I would make this for shrimp or any kind of baked fish. It's one of my favorite recipes I've made in quite a while.

A printable recipe is at the bottom of this post.  Enjoy!


Bay Scallop Gratin

        <p>Ina Garten (Barefoot Contessa) cooks the way I love to eat. I made this dish for my husband, for a date night at home. It&#8217;s very simple to make, and it impressed my husband. He said it was just like eating out at a fancy restaurant.  Very ...     

        See Bay Scallop Gratin on Key Ingredient.     


Tuesday, August 23, 2011

Butter Pound Cake | Butter Pound Cake From Scratch | Butter Pound Cake Recipe 2011

recipe for pound cake


Butter Pound Cake Calories


This sour cream, butter and lemon pound cake recipe is a few generations. It was my husband's grandmother recipe for an old sour cream, butter and lemon pound cake. My mother-in-law taught me how to do it. It is almost infallible, with its simple instructions. (He called her "one-step Pound Cake"). If it goes well for the sweet, this is a reliable showstopper! This cake was served to many people from all over the world, and everyone raves about, and it is addictive flavors.


how to make pound cake


Butter Pound Cake Cost


I have a funny story to tell you about this cake. A serious adverse event that is part of the "folklore McGourty." This happened about a month before my husband and I married when I have to "know" more and my future family.co


pound cakes


Butter Pound Cake Almond


One day while I was with her ​​parents in Aptos California, preparing for our upcoming wedding in Santa Cruz Mission, I helped my husband's mother with the household cleaner. I finished my duties while he was doing something for dinner. He realized that he needed in the supermarket for some ingredients for dinner that evening the head. When he leaves the house, she told me, "Susie, the only one I trust to be on my cake, can, you take the cake when the timer goes off."


Grab The Bookmarketer For Your Site

Sunday, August 21, 2011

Peanut Butter Filled Hot-Fudge Cupcakes (Warning: these are deadly)

I am still lamenting how summer blue skies, and warm temperatures has bypassed the Central Coast of California.  My tomatoes aren't pleased, either.  Then again, I've been reading tweets and blogs, from those of you who are melting in triple-digit temperatures-- so I have no right to complain.  At least, with cooler weather, I haven no problem  baking something in the oven.  I have a wicked mean sweet tooth.  I collect, by far, more dessert recipes than I do savory.

Baking is very therapeutic for me.  Those who hate to measure are (in my own theory) those who say they hate to bake.  I don't mind measuring ingredients.  The problem is, I have minimal self-control when it comes to not eating what I bake.

When I first spotted this recipe on "How Sweet It Is", I almost skipped reading about it.  Peanut butter, you see, isn't my favorite ingredient.  Sure, a PBJ sandwich sounds great with homemade jam.  I do enjoy a Reese's Peanut Butter cup treat every so often. Otherwise, peanut butter isn't something that triggers a food lust within me.  My husband loves peanut butter, and so I decided to bake this treat just for him. (Selfishly, my plan was that I'd be able to resist these.)

The first step in making the cupcake batter requires a hot fudge sauce.  (You will find a printable recipe at the end of this post.)  Most likely (if you're a baker) you have the items in your pantry:  flour, dark cocoa powder, salt, sugar, butter, milk (or water, but I chose whole milk) and pure vanilla.  If you scrutinize photos (which I've been known to do on occasion), I added the pat of butter at the beginning.  Then, I realized it's added at the end-- and I pulled it out.  Whisk the ingredients together with the hot milk (or water) and whisk until it thickens. Then add the pat of butter and vanilla, off heat.

I don't own a double boiler. Usually, I set a bowl over a low-simmering pot of water.  This worked out well, however.
 The sauce thickened in about five minutes.  It's divine, and it makes a lot more than you need for the batter.  Vanilla ice cream would be excellent with this sauce...

 The recipe directions doesn't say to strain the sauce, but I did anyway.  

15 minutes of time invested, start to finish, I have hot fudge sauce. Do I hear an amen?  Angels singing?  This stuff is pretty good, I must say!  I poured it into a squeeze bottle and now, for the cupcake batter--

We need flour, dark coco powder, melted butter, an egg, sour cream, pure vanilla extract, brown sugar, baking soda and salt.  

Preheat the oven to 350F. I used my stand mixer, but I think this can easily be done by hand-- with a whisk.  Begin by mixing the brown sugar and egg, Add milk, cream, butter and vanilla, and mix until combined. Stir in sour cream. Sift dry ingredients together and then add to the wet mixture. Mix until batter is smooth, then swirl in fudge sauce.
 Line a muffin tin (12 count) with liners and using a ¼ cup measure, add batter to each cup. (I use an ice cream scoop.)

 Bake for 15-18 minutes. 

I got 14 cupcakes, and I discovered that once the batter sits for 18 minutes (second batch), these puffed up even higher.   Just a side note. Let cool before frosting.

Oh yeah, frosting!

Cream butter and peanut butter together in the bowl of an electric mixer. Add powdered sugar with mixer on low speed and gradually add milk and vanilla extract. Add a pinch of salt and mix until frosting is smooth. If too thick, add more milk; if too thin, add more sugar.  This is your basic buttercream frosting.  Me, the Anti-Peanut butter lover took a taste.  Sweet, but not cloyingly sweet. The peanut butter flavor there, but it didn't go "Pow"!  Hmmm...

 For years, I frosted cupcakes with a small butter knife. I think that's a royal pain, if you ask me.  I like to pipe my frosting with a pastry bag.  I use a Wilton 1M Star tip with a disposable bag.  It's much easier to fill a pastry bag when you place it into a tall glass, then fold the top of the bag over it, like a cuff.  Fill the bag, squeeze the top and squeeze over a bowl to remove any excess air. There!  Now here's something cool I learned from "How Sweet It Is"... and it's sweet!

Plunge the tip into the cupcake and squeeze, while lifting up...

There ya go!  Frosting filled cupcakes.  Easy!

Squeeze and swirl the frosting... there!  Quick and easy...

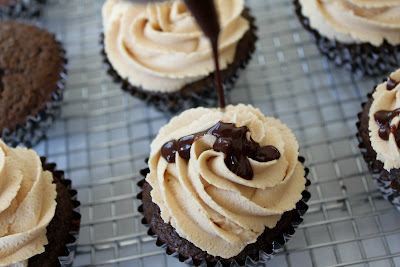
A few jimmie sprinkles or some shaved chocolate would be pretty. But, we have that fudge sauce...
The squeeze bottle works well (but drizzling with spoon can work)... slowly...

Come to mama!

I like!


The chocolate cupcake recipe has some very stiff competition, because I am in-love with my Moist Chocolate Cake recipe.  I don't like dry cupcakes... well, who does? How do you eat your cupcake?  Do you pull off the bottom and put it on top-- and eat your cupcake like a sandwich? Just curious... as that's how I do it. I want an even ratio of frosting to cake, you see. 


Well, look!  I won't have to do that with this frosting technique  I have frosting inside, and on top.  Oh dear, my sweet tooth is throbbing and at full attention.  I have to taste this...

VERDICT:   Oh, help me, Rhonda!  The cake is incredibly moist.  It's baby soft, and tender, and the chocolate flavor is spot on.  The frosting-- I'm toast.  Really, this is not what I had planned expected.  It's phenomenal.  Seriously, I'm diggin' the peanut butter and chocolate combo.  I'm in serious trouble, here.   My plan to bake a resistible dessert was foiled.  I took most of the cupcakes to the office and they were gone in a nano-second.  I had some very happy peanut butter and chocolate lovin' co-workers.  Winner!

This cupcake has altered my ho-hum attitude about peanut butter.  Yes, I'd make this again...and again...but only for potlucks or bake sales.  I can't have them in my kitchen, or I can't promise that I'd have any kind of self-control.  You need these in your life. Even if just once...


Here's the printable recipe:


Peanut Butter Filled Hot-Fudge Drizzled Chocolate Cupcakes


        <p>Yes, that&#8217;s a mouthful!  I found this recipe on &#8220;How Sweet It Is&#8221; and decided to make it&#8212; would you believe, my reason was that I&#8217;m not that fond of peanut butter? I figured I&#8217;d be able to resist these treats that ...


        See Peanut Butter Filled Hot-Fudge Drizzled Chocolate Cupcakes on Key Ingredient.