Friday, August 27, 2010

Summer Garden Tomato Compote & Char Crust Chicken


Well, hello again!  I've been missing in action since last weekend. Sorry! At last, it's Friday and can try to post some recipes for you. The weather across the United States has been all over the place.  While my girlfriend, in Rhode Island has been telling tales of miserable heat and humidity, and extreme weather changes to rain-- well, we folks on the Central Coast of California hadn't seen sun in weeks.  Suddenly, we had a heat weave that hit triple digits for two days. My tomatoes were happy little campers!

Just the week before, I had all kinds of little green tomatoes...

...and the next time I looked, they were bursting with summer sunshine ripeness. I had to start using these fast!
Roasted tomatoes, are one of my favorite ways to enjoy tomatoes.  I turned the oven on to 375F and sliced  a Vidalia onion-- my last one, in fact.  I sliced 2 cloves of fresh garlic and heated some olive oil in my beloved cast iron skillet...

Next, I decided to cut some thyme, from our garden. Dry would work fine, too.  I cooked the onion until tender, added the garlic and cooked that for a minute. Next, I added the thyme, kosher salt & black pepper (to taste).  I turned off the heat and added these beautiful yellow pear tomatoes.   Then I paused, and went back into the garden...

...and I grabbed some cherry tomatoes that were so ripe, some of the skins were already splitting.  These were added to the mix.

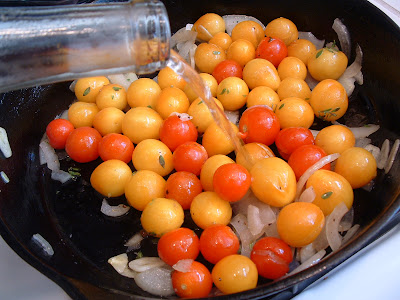
I had some leftover white wine (sauvignon blanc), so I added that (about 1/4 cup). I popped the skillet into the oven, next to some chicken breasts that I was roasting.  (You could certainly cook these on the stove top if you choose to.)

About 15 minutes later, the tomatoes looked roasted to perfection.  I set the skillet on very low heat, to let the wine finish reducing.  These were so fragrant, I wish I had cooked some Angel Hair Pasta!

VERDICT:  Amazing!  My taste buds said "sweet", "savory", "mildly garlicky" and "dee-licious!   I so will make this again, as a pasta.  

About that chicken that I mentioned was roasting in the oven-- I was contacted by Susan Eriksen, "AKA Mrs. Char Crust".  Susan offered to send a few of her special rub blends for me to try.  As promised, I received an three different Char Crust blends to try.

I had just purchased two beautiful air-chilled, free-range chicken breasts (bone-in) at Whole Foods (which is where I can also buy this product.  I decided to try the Roasted Garlic Peppercorn flavor. This rubbed is described as:
Savory roasted garlic and fresh cracked peppercorns make music in your mouth. With added lilt of worcestershire and lavender, this symphonic sensation creates a crescendo of flavor with steak, lamb, fish (especially salmon), and roasted potatoes.
Sold!  Of course, I had to let me nose explore the different ingredients in this rub.  Wow!  After patting the chicken dry, I did just what I was supposed to do-- I rubbed it generously all over.  Using my second cast iron skillet, I decided to sear the chicken, starting skin side down.

About 4 minutes later, I flipped each breast over.  Very nice, I thought!  The skin is not burned at all. It's the rub, which was very fragrant.  I roasted the breast for about 18 minutes, checking that the temperature reached about 170F. 

Then I let the chicken rest for about 10 minutes. Now, for the moment of truth...

I was losing natural light, so these photos aren't as detailed as I'd like. I can tell you that the chicken was very juicy.  I give credit to a few things. Using chicken that is bone-in, I am convinced,decreases the chances of ending up with dried out chicken breast meat.  It was cooked just the right amount of time, too, by watching the temperature and then letting it rest.  The trademark claim on Char Crust products is "Seals in the Juices", and I have to agree!

VERDICT:  There are a lot of flavors working in harmony with this delicious rub seasoning. At first, I thought I tasted sage. I read the ingredient label, and I was wrong.  Maybe it's the combo of Worcestershire and soy, herbs, garlic and other spices-- who knows? We both liked the chicken very much.  Thank you, Char Crust for letting me try this product. I have made a few other recipes, which I will try to share throughout the coming week.  This product is a great way to make plain chicken come to life with flavor and lots of juiciness! Oh, I will also be announcing a giveaway where you can receive Char Crust samples to try for yourself. Soon... very soon!

Pictured:  Char Crust Roasted Chicken Breasts, Tomato Compote and Hasselback Potatoes.

The next recipe I'll be sharing with you involves figs.  Wow, was this dessert great with this very dinner I just shared with you. Coming up this weekend (I hope)!


Wishing all of you a wonderful weekend with perfect weather!


Tomato Compote

        <p>Roasting cherry tomatoes with sweet onion, white wine and herbs takes only 15 minutes for a perfect side dish. It&#8217;s delicious as a side dish to any kind of grilled chicken, fish or even pork.  Added to Angel Hair Pasta, and you have a delicious ...    

        See Tomato Compote on Key Ingredient.    


Saturday, August 21, 2010

Hasselback Potatoes -- Pretty easy, pretty looking and pretty darn tasty!

I am adjusting to my new work hours, but it does mean that cooking dinner -- and sharing it with my husband-- doesn't happen Mondays through Thursdays.  Friday nights are usual spent enjoying a Happy Hour Cocktail and tapas for a light dinner, that allows for me to unwind from my work week. It looks like I'm starting a new tradition, where I prepare a "Date Night" dinner at home, on Saturday nights.  Oh, there will be Date Night Dinners at a romantic restaurant in our backyard of Carmel (California) in the future! For now, I like to challenge myself to make dishes that look worthy to be served by a waiter.  In this case, that would be "moi"  wearing the apron  presenting the dinner on the table.  In my husband's case, he is the cleaning crew.  This arrangement works just fine! Not only do we save money, but we enjoy quiet dinners, for two, in our own home.

This pretty potato side dish that easy to make, but makes a beautiful presentation on your dinner plate. Hasselback Potatoes (or accordion potatoes)  were first introduced in the 1700s by a restaurant located in Stockholm named Hasselbacken. I found several variations for this recipe, and I decided to play around a little. The next time you want to impress company, these take just a few minutes to prepare. Any kind of potato will do-- Russets, Red Bliss are perfect. In my case, I had Yukon Golds on hand.  Wash the spuds...

Preheat the oven to 400F.  You'll want a baking sheet lined with either parchment paper or foil; or you can use a silicone mat.  If you have a wooden spoon, you have an fool-proof guide.  The technique is to be able to make 1/8" thick slices, without cutting all the way through. Otherwise, you're making potato chips.  By laying the potato into the spoon, you will be unable to slice all the way to the bottom.  If your potato is big, then slice the first half, turn the potato around and slice the second.  I decided to add fresh garlic by slicing a garlic clove very thin. Insert one...maybe two slices per potato.  I melted 2 Tbsp unsalted butter and mixed it with an equal amount of olive oil.  You can pour it over the potatoes, or you can brush it on.

You can be creative with your seasonings.  I used kosher salt & fresh cracked pepper. Because I have an abundance of thyme in my herb garden, I decided to add a few sprigs to add a little more flavor.  While these potatoes weren't as large as a baking potato, I still needed to bake these for one hour and ten minutes.

These potatoes should turn out crisp on the outside and tender on the inside.

OPTIONAL: I chose to brush a little more olive oil, during the last 10 minutes, and to sprinkle some fresh parmesan cheese on top. I'm glad that I did.

VERDICT:  My husband felt that the garlic was a little too much for him. Me? I thought the garlic was perfect. Then again, I love garlic-- even on a Date Night! Adjust accordingly.  

The rest of the dinner was a special Char-Crust Chicken, served with a Garden Tomato Compote, which was so delicious!  I will share the remaining recipes tomorrow.  We have a movie to watch, at home and the night is still young.  To me, cooking a flavorful dinner for my husband is my way of showing him how much I appreciate the wonderful husband that he is.  Isn't that why we food bloggers photograph and talk about what we make? We are passionate about good food!   Fortunately, my husband appreciates my cooking efforts and he lets me know.  While I blogged this dinner, he cleaned the kitchen.  What a deal!

A printable recipe is at the bottom of this post.

Made with love,


Hasselback Potatoes with Garlic & Fresh Thyme

        <p>This pretty potato side dish that easy to make, but makes a beautiful presentation on your dinner plate. Hasselback Potatoes (or accordion potatoes)  were first introduced in the 1700s by a restaurant located in Stockholm named Hasselbacken. I found ...    

        See Hasselback Potatoes with Garlic & Fresh Thyme on Key Ingredient.    


Sunday, August 15, 2010

"Hello Dolly" Magic Cookie Bars

My husband seldom asks me to make a specific dish or dessert.  Today, is a mild summer day, so I had no problem with baking.  I'm reading that other parts of California are experiencing triple-digit temperatures. Not on the Central Coast of California!  Even though I live in the sunbelt, I doubt the temperatures have gone any higher than 72 degrees.  I asked my husband what treat he'd like for his lunch box.  "Hello Dollies", he replied, with hope in his voice.  This bar cookie is a classic-- otherwise known as Magic Cookie Bars, from Eagle Brand.  I don't know where his father got the name "Hello Dollies"-- it must be a Missouri version? So, I scoured the pantry, and I had one can of condensed milk on hand. I keep walnuts in the freezer, and always have an assortment of chocolate chips and other flavors.  My husband was in luck, when I found a box of graham crackers.  These took 10 minutes to put together:

Preheat the oven to 350F. You need one cup of nuts, chopped.  Pecans would be good, but I chose walnuts for today.  I pulsed one package of graham crackers to equal 1 1/2 cups.  Melt one stick of butter and combine to the graham cracker crumbs.  I love parchment paper, otherwise spray a 9x13 pan with nonstick spray.  I prefer to make a "sling" of two sheets of cut parchment paper so that I have about 2" of overhang on each side.  You can use aluminum foil, if you don't have parchment paper. Ever since I started doing this extra step, I no longer struggle with cutting bar cookies or having them stick to the pan. Pour a 14-oz can of  condensed milk on top of the crust. If you have an offset spatula, it makes the even spreading so much easier!

Sprinkle two cups of chocolate chips, evenly. Then sprinkle 1 1/3 cups flaked coconut.

Sprinkle one cup of chopped nuts as the last layer....
Gently press down on the layers.  Bake for about 22-25 minutes, or until golden brown.

Since I took the time to make a "sling", I simply lift the cookie right out of the pan and onto a cooling rack..

One of my favorite baking tools is this giant spatula by Wilton.  I found mine at a "Michael's" Craft Store.  No more broken cakes or bar cookies!  Let this cook for at least 15 minutes... tell drooling husbands (or kids)  to wait.

The crust is chewy from the condensed milk. I cut these into 24 bars...

Baker's Rights... I get the first taste. 


VERDICT: I can see why these are Craig's #1 favorite cookie (next to peanut butter).  I love the chewy, buttery crust.  It's sweet, but not cloyingly sweet.  The balance of chocolate, coconut and nuts is perfect.  These are rich, and perfect to tuck into a lunch box.  I recommend a glass of milk, though.  I see this cookie recipe on blogs during Christmas Cookie season.  I think this is a fast and easy cookie all year round. As for me, I'm going to limit myself to my one cookie. Today, at least! The rest is for my hard-working husband, who deserves his boyhood treat. He's been busy taking care of our herb and vegetable garden.  Make these for your loved ones. They'll thank you.  If you've made these yourselves, then you know what I'm talking about!

These will definitely put a smile on your face.  A printable recipe is at the bottom of this post. 

For those of you who are roasting in record high heat-- save this recipe for a time when turning on an oven doesn't make you gasp in horror.  I hope you do find cooler temperatures! Tomorrow is back-to-school for the students where I work.  I am expecting to be busy and tired for most of the week. I'll do my best to share more recipes.  I miss not being able to post more than once or twice a week, and I thank you for lovely comments and private emails.  I  love to share with all of you what's cooking in our home. I feel so blessed!


Magic Cookie Bars (Hello Dollies)

        <p>This is a classic bar cookie recipe that is very easy to make. My husband knows these, from his childhood, as &#8220;Hello Dollie&#8221;.  You need a can of sweetened condensed milk (not evaporated milk), graham crackers, coconut and nuts.  This ...    

        See Magic Cookie Bars (Hello Dollies) on Key Ingredient.    


Friday, August 13, 2010

Pan Seared & Roasted Halibut, Summer Garden Succotash and Yellow Lemon Rice


As a kid, I disliked fish.   My mother, in her true German way, loved to cook whole trout and serve it to us this way.  When you're young, if it doesn't look like fish sticks and isn't served with tater tots-- well, a fish with cooked eyeballs looking up at me is about as disgusting as you can get.  I refused to eat it. Period.

I avoided fish at all costs, until my early thirties.  That's when I discovered Petrale Sole.  It was a whole new world!  I have also learned to appreciate fresh salmon and fresh tilapia.  I've also discovered that fresh trout, sans eyeballs, is a very tasty fish.  My favorite way to prepare fish is to sear and roast it (grilling it comes in second).  I love the flavorful crust that develops on high heat on a stove, and then is roasted perfectly to present moist and tender fish.   Ever since I watched "Food Inc." I have decided to spend a few extra dollars to buy fresh and non-farmed fish.  I decided to splurge and buy fresh Pacific (Alaskan) halibut, at my local fish market, which is considered to be the best sustainable choice-- @$17.00 a pound. Ouch.  "How long ago was this halbut swimming off Alaskan waters?", I asked.
"Two days ago", he replied.
"I sure hope so", I thought to myself.


When I arrived home, I opened the packaged and sniffed the fish.  Nothing.  This is good!  Fresh fish shouldn't  stink "smell" like fish.  To keep things simple, I reached for my can of "Old Bay Seasoning" and preheated the oven to 400F.  I grabbed my favorite cast iron skillet, added a little olive oil and heated the pan until the oil just began to ripple and smoke...

I left the fish to sear for about 3 minutes, without moving it around.  By lifting a corner, I could see that I was achieving that beautiful brown sear.  I flipped the halibut and put the entire pan into the oven.  I started the side dish while the halibut was searing...

I originally wanted to make a zucchini gratin. However, our squash isn't quite ready. We're having an unually cool summer with less sunshine that usual.  Our tomatoes are behind schedule, but they are showing promise.  I picked the few cherry, Sweet 100's and pear tomatoes that I could find.  I found one zucchini squash that was ready to cook.


So I pondered what to do with these....


I spotted two ears of corn a friend had given me from her CSA box.  In the bowl  have fresh corn, zucchini and tomatoes.
I decided to slice a vidalia onion I had, on hand.  I drizzled the vegetables with olive oil, kosher salt & fresh cracked pepper....

...and I set the whole pan into the oven, next to the roasting halibut.  You could cook the succotash entirely on the stove top, if you prefer.

 It took about 5-6 more minutes for the fish to reach an internal temperature of 145F.

On a whim, I added a bit of dried thyme (fresh would have been great) and then a little bit of freshly grated romano cheese.  Traditional succotash, I know, is made with corn and beans...and even some heavy cream.  This version is much healthier and took about 10 minutes for the cherries to pop.  They were ready.

 For "Yellow Rice", I rinsed white rice, added about 1/4 tsp of tumeric, used half chicken broth and half water. When the rice was ready,

...I added some lemon zest and squeezed lemon juice and gently blended. You can add fresh herbs and even peas.  It's inexpensive to make, and the color is really pretty. This dinner was ready in less than 45 minutes.

I served a chilled bottle of white wine, and the two of us had a quiet and romantic dinner at home.


VERDICT:  Halibut is currently my favorite fish.  This fish is very mild, and was moist and perfectly cooked.  The succotash was so delicious, if I do say so myself.  There is something to be said when you can enjoy vegetables that were freshly picked from your own backyard!  We grow most of our vegetables in containers, and I encourage anyone to try this.  As for the fish-- it was well worth the price I paid.  It feels good to support my local fish monger, and I truly could taste the difference from farm-raised not-so-fresh fish.  My childhood aversion to fish is gone.

This dinner would have cost, easily, $50.00 in a restaurant.  Of course, the dishes don't wash themselves.  Fortunately, my husband is great about helping with that.

That's what I call a Date Night!  I cook. He cleans.  Then, we cuddle and watch a movie at home.

No recipe card for the fish is needed, don't you think This is all technique, and not being afraid to use herbs and seasonings. The side dish recipe cards are below.


Happy Summer!


Yellow Lemon Rice

        <p>Saffron rice is dubbed the most expensive spice in the world. Sometimes, I like to make a simple “Yellow” Rice by using a tiny pinch of Tumeric— this gives rice a pretty yellow color, but doesn’t add any flavor to the rice. It’s a versatile way to ...    

        See Yellow Lemon Rice on Key Ingredient.    


Summer Garden Succotash

        <p>Traditional succotash is made with corn and lima beans. Some versions add heavy cream, which is delicious and loaded with calories.  I had some fresh corn, cherry tomatoes and zucchini and I created this side dish to be served with fresh fish. It was ...    

        See Summer Garden Succotash on Key Ingredient.